

[ WAA Home | ProjeX Home | Download ProjeX | Help using ProjeX | ProjeX FAQ | About WAA]
![]()
Now that we have set up our sub-groups (of course more can be inserted later), we need to define the tasks for each sub-group.
We want to define 4 tasks to be part of the sub-group 'Pre-processing', so the blank rows are added using Excel's standard 'Insert Rows' function.

For each task we can then enter the description, starting date and duration. ProjeX, by default defines tasks by start and duration, if you want them to be defined by start and end dates then this must be set in the 'Task definition' dialog. We actually want the start of each of the tasks to be dependent on the end of the previous one. The easiest way of doing this is to us Excel's formula function. Select the starting date cell of the next task and type '=', then using the left mouse button select the ending date cell of the previous task.
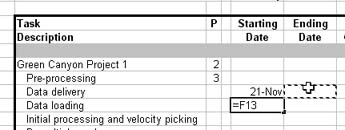
We then type +1 on the end of the formula because we want the task to start on the next day.
Having done this for each of the tasks the start and end dates are still blank because ProjeX has not set the formulae, this does not matter for the moment.
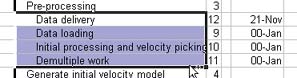
To tell ProjeX that these tasks are part of the sub-group 'Pre-processing' we must indent them. Select the four task descriptions using the left mouse but and then
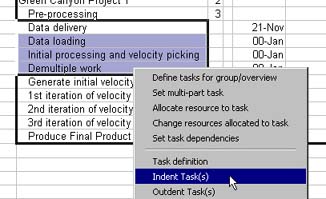
This indents each of the selected tasks by one each time we use the option.
The date range of our tasks is still not displayed correctly and we have not generated a Gantt chart - before we do that lets tell ProjeX how we want to display the tasks (indented) and that we want to plot the groups.
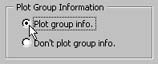
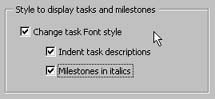
From the main ProjeX menubar entry lets bring up the 'Display Properties' dialog again.Under the 'Display Style' tab select the 'Plot group info.' option and also under the Annotation tab select the 'Change task Font style' option.
| Display Style tab | Annotation tab |
 |
 |
We are now ready to generate a Gantt chart using the 'Generate Gantt chart' option from the ProjeX entry in Excel's menubar.
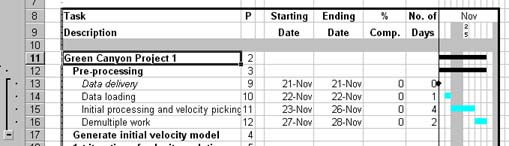
On the left of the worksheet we now have a ![]() icon which shows that we
can collapse this sub-group to just show the sub-group title. As
we only have one sub-group defined the overall group bar show the
same time range as the sub-group
icon which shows that we
can collapse this sub-group to just show the sub-group title. As
we only have one sub-group defined the overall group bar show the
same time range as the sub-group
Lets do this for the rest of the sub-groups ...
![]()